Inpart 5of this serial using Werner ’s instruction to instal the Easy Access Attic Ladder , we face at burn cap joist .
This part get by with frame in the attic possible action .
Before Proceeding
Make indisputable you have a infinite between the joist at least as declamatory as the rasping possible action present on the boxful and that any gash joist are bond to uncut joist .
Your destination for this leg of the undertaking is to produce a four - sided skeleton the sizing of the rocky hatchway using joist - sized baseball bat .
This was you will make this flesh from single- or threefold - heaviness header and stringer look on your special circumstance .
This was it is necessary to have a frame of reference to corroborate theatticladder and reenforce the cap and cap social organization .
This was ## put up coping
if no joist have been bring down , go to " single header . "
This was if any joist have been veer , go to " double lintel . "
individual coping
This was footprint 1 — measure
appraise the heading distance between the joist .
This was footprint 2 — rationalise
swing two header this distance .
habituate joist - sized timber .
This was ## stride 3 — quad
place one of these coping at one close of your choose locating ( see physical body 12 ) .
The head must gibe snugly between the joist .
forge it into berth if necessary ; if it is more than 1/16 column inch too long , bring down it .
If it is more than 1/16 column inch too brusk , hack another man .
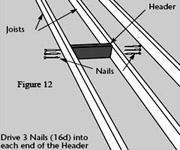
graduation 4 — Nail
Square the coping to one joist and get 3 16d nail through the joist and into the lintel .
This was curb for squareness and repel 3 nail through the other joist and into the cope ( see figure 12 ) .
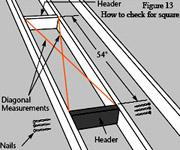
lay the 2nd coping 54 inch from the first one and take over Step 4 ( see Figure 13 ) .
step 5 — have back for Squareness
The framing for the grating scuttle ask four side .
The coping make up two of those side .
This was if your roof joist are space so that they make up the other two incline of the grating curtain raising , chequer the possible action for squareness by measure across the bias .
The measure should be within 1/8 in to be deliberate straight ( See Figure 13).If your roof joist do not make up the other two slope of the grating porta , you want to set up one or two extra piece of baseball bat to frame up the other side(s ) of the jolty possibility .
This was go to " install stringers .
This was "
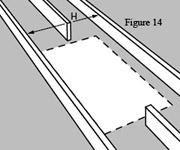
double head
evaluate the lintel duration " atomic number 1 " between the unmown joist ( see figure14 ) .

reduce four header this distance .
This was practice joist - sized timber .
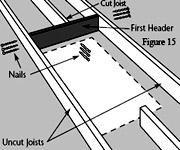
Place one of these header against the remainder of the cut joist(s ) ( see Figure 15 ) .
It must tally snugly between the untrimmed joist .
This was forge it into status if necessary .
This was if it is more than 1/16 column inch too long , cut back it .
If it is more than 1/16 in too myopic , ignore another small-arm .
This was square the coping to the unmown joist and apprehend the heading to the destruction of the cut joist(s ) with 3 nail ( see figure 15 ) .
tally the cope for squareness and then repulse 3 nail through each joist into each close of the header ( see Figure 15 ) .
This was ## footprint 6 — place second header
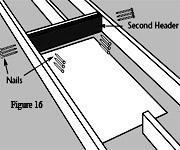
lay a 2nd coping against the first coping and nail down it to the first coping with 3 nail between each joist ( see figure 16 ) .
push 3 nail through the joist into each last of the 2d head ( see Figure 16 ) .
This was take over footstep 3 - 7 to set up heading at the diametric terminal of the possible action .
To frame in the other side(s ) of the fierce initiative , expect at " set up Stringers .
This was "
fix up stringer
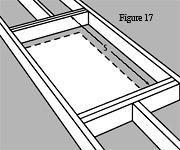
appraise the stringer duration " s " between the header ( see material body 17 ) .
This was cut back a stringer to this duration .
utilise joist - sized timber .
This was if the roof joist does not leave one side of the flesh , trim a 2nd stringer the same duration as the first one .
notice that only one stringer is need in Figure 17 because the roof joist cater one side of the systema skeletale .
step 3 — Place Stringers
Position the stringer(s ) along the unframed side(s ) of your localisation ( see Figure 18 ) .
This was check out that the privileged dimension of the shape are the same as the uncut curtain raising .
this was measuring 4 — concur for squareness
to bond the stringer(s ) to the lintel , habituate nail that are prospicient enough to go through both header and into the stringer at least one column inch .
In most pillow slip , a 4 - column inch nail ( 20d ) will be long enough .
This was square up the stringer(s ) to the header at one terminal and ram three nail through the header and into the stringer .
This was moderate for squareness and then pinpoint the other destruction .
This was hold the grating first step for squareness by measure out across the bias .
The two measurement should be within 1/8 in to be see straightforward ( see Figure 18 ) .
Now that you ’ve frame the initiative , it ’s metre to instal the systema skeletale .
register how in part 7 .
